Event loop resources
Table of contents
Part of “Learn to write async code in JavaScript.”
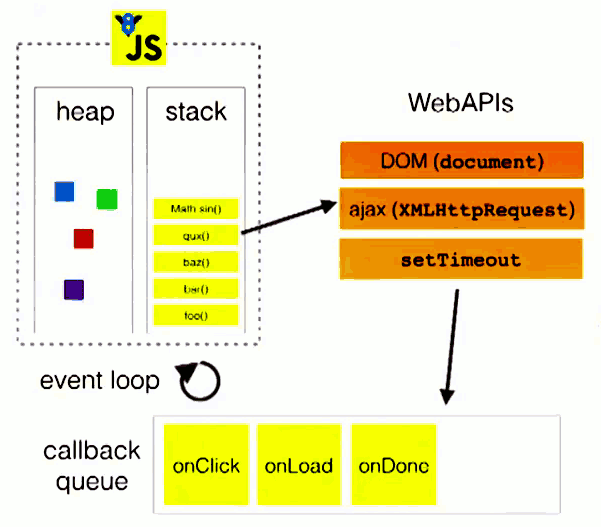
A basic understanding of the event loop can give you a lot of confidence if you want to write async code. You can skip to the promises or async/await pages if you want something more practical, but I suggest you learn about the event loop first because it helps you understand the flow in an async program. In other words, the event loop is the bigger picture, and promises are a part of it.
An image for the event loop. Callback queue is sometimes referred to as event queue and the stack as call stack.

Jake Archibald: In the Loop
Jake, as a front-end developer, focuses on the browser, not on Node.
Key takeaways from Jake’s video
- 09:00: The render steps of the browser in relation to the event loop.
- 12:28: If you want to animate something, it’s a good idea to put your code inside a
RequestAnimationFrame(RAF) because it runs right before the browser renders. On the other hand, if you use asetTimeout—that means you queue a new task—the browser may decide to not render at all if the task takes longer, or if the browser is busy with other tasks. It may take a while to see the change. - 16:00: RAFs run at the start of the frame followed by the rendering. Tasks can run in random places during the frame. RAF → Rendering → Task 1 → Task 2.
- 18:00: Avoid timers that queue tasks, and instead, prefer RAFs to batch work before the rendering. Not sure about that, it needs some research.
- 21:00: An animation detail: Even listeners (e.g. clicks) run as tasks. If you start an animation, by changing a CSS property, inside an event listener, and you complete that animation inside a RAF, you probably won’t get the animation you expect. That happens because of the ordering of the tasks and RAFs inside a frame—see 16:00. The browser may not get the chance to render between them. If you want to animate with JavaScript, start your animation in a RAF, and then inside it, request a new RAF and finish the animation there.
- 23:25: Edge and Safari run the RAF after rendering—may not be true anymore.
- 26:00: Micro-tasks (promise code inside
.then) run whenever the event loop is empty, and if there are more than one, they run until they all complete. - 27:36: Differences between Tasks, RAFs, and micro-tasks. Tasks run one at a time, and RAFs run until they are all complete—except the ones that were queued inside a RAF. Micro-tasks, similar to RAFs, run until they are all complete, but they also run the ones that were queued while executing a micro-task.
- 31:00: A detail with the event handlers and the call-stack. Try to guess what the following snippet will print:
button.addEventListener("click", () => {
Promise.resolve().then(() => console.log("Microtask 1"));
console.log("Listener 1");
});
button.addEventListener("click", () => {
Promise.resolve().then(() => console.log("Microtask 2"));
console.log("Listener 2");
});Because each event listener runs in a different task, the following snippet prints:
Listener 1
Microtask 1
Listener 2
Microtask 2But, what happens if you perform a click with button.click()?
button.addEventListener("click", () => {
Promise.resolve().then(() => console.log("Microtask 1"));
console.log("Listener 1");
});
button.addEventListener("click", () => {
Promise.resolve().then(() => console.log("Microtask 2"));
console.log("Listener 2");
});
button.click();Now the code above prints:
Listener 1
Listener 2
Microtask 1
Microtask 2This happens because the events are called synchronously if you use button.click(), and the call-stack is not yet empty. It needs to return from button.click().
Philip Roberts: What the heck is the event loop anyway?
Key takeaways from Philip’s video
- 4:15: Explains the call-stack.
- 12:48: How Web APIs like
setTimeoutwork inside the event loop. - 22:30: It’s better to defer expensive work to separate tasks, instead of doing it in a single task, because you give the browser some time to render between tasks.
- Some task examples are the
events,setTimeouts, and scripts—this includes our main code too, not only random scripts.
YDKJS Async & Performance book
YDKJS - Async & Performance - Asynchrony: Now & Later
YDKJS Notes
Jake’s video covers most of them.
- Event loop explanation.
- Async console. The
console.logmay not always give you the result you expect because the implementations vary. - Promises are not added to the event queue, but instead, they run at the end of the current task as jobs—aka micro-tasks.
- Jobs section: Because they run after the current task (a tick) of the event queue, you can say that they run later, but as soon as possible. Consider the following example:
setTimeout(function anotherTask() {
console.log("Another task");
}, 0);
console.log("Synchronous");
Promise.resolve()
.then(() => {
console.log("Micro-task 1");
})
.then(() => {
console.log("After micro-task 1");
});
Promise.resolve().then(() => {
console.log("Micro-task 2");
});
/**
* This prints:
* - Synchronous
* - Micro-task 1
* - Micro-task 2
* - After micro-task 1
* - Another task
* /This also shows that when they start running, they run until there is none left inside the micro-task queue.
Other Links
- MDN: Concurrency model and Event Loop. An overview of the event loop and its properties.
- Node.js event loop. Most of the previous resources talk about the event loop in browsers; this is for Node.
- https://javascript.info/event-loop: Event Loop summary, tasks/micro-tasks, and some use cases on when to defer tasks. A good point they make, in the end, is to use a worker for CPU-intensive tasks. The worker runs on a different thread, not on the main thread, and thus, doesn’t block it. May seem obvious nowadays, but the other resources don’t mention that.
Other things to read
Popular
- Reveal animations on scroll with react-spring
- Gatsby background image example
- Extremely fast loading with Gatsby and self-hosted fonts